En movimiento:
21.052 04-09-2008 21:27:18
Re: Melty Blood: Actress Again (ARC). (22 respuestas, enviadas el Hablemos de juegos)
Vuelve a actualizar:
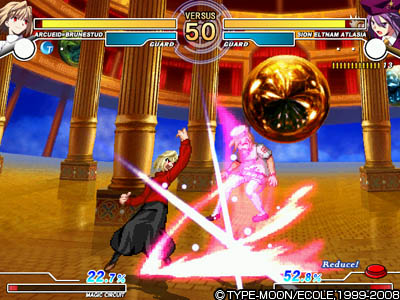
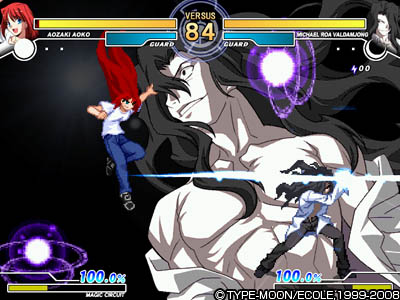
21.053 04-09-2008 21:21:38
Re: Nostalgeo no Kaze (DS). (2 respuestas, enviadas el Hablemos de juegos)
Intento ignorar este lanzamiento, pero la escenografía y los diseños que se están fabricando me lo pone difícil... Sitio oficial actualizado con vídeo.
21.054 04-09-2008 21:17:42
Re: Hoshi no Kirby Ultra Super Deluxe (DS). (6 respuestas, enviadas el Hablemos de juegos)
http://www.gpara.com/comingsoon/kirbydx/080904/
Sale el 6 de Noviembre. Es curioso que todo el material gráfico de una "preview" de G-Para sea de la adaptación occidental del juego.
21.055 03-09-2008 21:50:43
Re: Death Smiles (ARC). (72 respuestas, enviadas el Hablemos de juegos)
La fuente original es el salón Alpha Station, que nos regala además el "flyer" a buena resolución:

21.056 03-09-2008 21:47:08
Re: Gradius Rebirth (WII). (17 respuestas, enviadas el Hablemos de juegos)
El parpadeo es efecto del entrelazado, no de la alta resolución "per se".
Y este Rebirth parece ir presentado en alta, que me da la sensación de que te empeñas en ignorar el dato.
Y a ambos dos: desechad el binomio "baja" + "frecuencia" de vuestro léxico; no tiene sentido tal y como lo estáis usando.
21.057 03-09-2008 18:08:03
Re: Death Smiles (ARC). (72 respuestas, enviadas el Hablemos de juegos)
AM-Net ha puesto fecha a la salida de Mega Black Label: tan pronto como el 10 del 10:
http://am-net.xtr.jp/game/profile.cgi?_v=1220081803
Precio estándar; 248000 yen.
21.058 03-09-2008 18:06:14
Re: Gradius Rebirth (WII). (17 respuestas, enviadas el Hablemos de juegos)
Marshall escribió:
talibanes de la baja frecuencia.
¡!
21.059 03-09-2008 13:10:09
Re: Ketsui, en DS. (13 respuestas, enviadas el Hablemos de juegos)
Hay un pesadísimo vídeo promocional sobre el DVD de acompañamiento en el sitio oficial, que acaba de actualizar:
http://www.arikaonline.com/download/mov … 902_00.mpg (200 MB +)
21.060 03-09-2008 12:57:17
Re: Daemon Bride (ARC). (31 respuestas, enviadas el Hablemos de juegos)
Capturas a su resolución nativa:
21.061 03-09-2008 12:53:17
Tema: The King of Fighters 2002: Unlimited Match (PS2). (21 respuestas, enviadas el Hablemos de juegos)
Pues tal y como prometieron, KOF '02 también va a tener una actualización a la KOF '98. Se ha confirmado en la lista de juegos presentes en el Tokyo Game Show del mes próximo, publicada por la propia organización:
Más interesante aún, quizás, es que parece no ser el último volumen para la Neo-Geo Online Collection, pues un "ADK Spirits" también aparece listado (Magician Lord al fin, imagino). Conversiones de KOF '98: Ultimate Match para XB360 y Samurai Spirits: Rokuban Shoubu para PSP completan las novedades de SNK Playmore.
21.062 03-09-2008 12:45:28
Re: Suggoi! Arcana Heart 2 (ARC). (20 respuestas, enviadas el Hablemos de juegos)
Lo mismo que en Famitsu Dot Com, pero mejor:
21.063 03-09-2008 12:43:06
Re: Super Robot Taisen Z (PS2). (30 respuestas, enviadas el Hablemos de juegos)
http://videogamerx.gamedonga.co.kr/zbxe/973168#0
Sale el 25...
21.064 03-09-2008 11:12:03
Re: Cross of Venus (DS). (7 respuestas, enviadas el Hablemos de juegos)
En un rinconcillo de la última Famitsu, al fin. Es lo que tiene el no pasar por caja, imagino:

21.065 03-09-2008 11:06:13
Tema: Shining Force Feather: Sega meets Flight Plan. (6 respuestas, enviadas el Hablemos de juegos)
Desvelado en Famitsu el próximo juego de presupuesto para DS por parte de Sega tras World Destruction. RPG con combates que toman elementos propios de los "tactics" y del sistema de Valkyrie Profile. Curiosa mezcla:
http://videogamerx.gamedonga.co.kr/zbxe/973047#0
Edito: ¡Flight Plan en el desarrollo!
21.066 03-09-2008 10:59:45
Tema: Annie no Atelier. (10 respuestas, enviadas el Hablemos de juegos)
Segunda entrega para DS de la saga más longeva de Gust, estrenando ilustrador. Famitsu:
21.067 03-09-2008 10:56:37
Re: World Destruction (DS). (25 respuestas, enviadas el Hablemos de juegos)
Nintendo Dream: http://videogamerx.gamedonga.co.kr/zbxe/972996#0
21.068 03-09-2008 00:22:15
Re: Gradius Rebirth (WII). (17 respuestas, enviadas el Hablemos de juegos)
En Sazanami le han dedicado una entrada. Dicen que muchas de las fases extra de las versiones domésticas de la saga están recreadas en Rebirth. Apuntan que está concebido para hacer ciclos (con grandes diferencias de una vuelta a otra) y superar marcas, y que la música es de Santaruru (Death Smiles, Daifukkatsu y un largo etcétera ( http://www.ab.cyberhome.ne.jp/~manabu/san/ )). Y que por 1000 yen es imposible pedir más...:
21.069 03-09-2008 00:15:31
Re: Para reírse un rato. (8 respuestas, enviadas el Compra-venta y derivados)
21.070 02-09-2008 22:28:23
Re: Gradius Rebirth (WII). (17 respuestas, enviadas el Hablemos de juegos)
"Ripeo salvaje de episodios previos con gráficos rehechos" = "mix de escenas de Gradius anteriores". (...)
No nos rasguemos las vestiduras más de la cuenta, tampoco. No es "Gradius VI". Es un juego de 1000 yen. Y, como "mix", no parece del todo malo. Conserva bastante de la esencia original, como dice Rad. Si por alguna razón al final resulta que el juego emplea el modo de baja resolución de Wii, puede tener su gracia. Y estando M2 en el desarrollo ( http://www.mtwo.co.jp/ ), como Chaz ha encontrado, tal vez nos encontremos con la sorpresa.
21.071 02-09-2008 20:26:36
Re: The King of Fighters XII (ARC). (129 respuestas, enviadas el Hablemos de juegos)
Mismas capturas a mayor resolución aún en este enlace:
http://gnn.gamer.com.tw/7/32247.html
Empiezo a vislumbrar cosas que no me gustan un pelo, pero mejor será esperar a ver algo a su resolución nativa para hablar. Vía http://www.cyberfanatix.com/
21.072 02-09-2008 19:52:59
Re: Gradius Rebirth (WII). (17 respuestas, enviadas el Hablemos de juegos)
Mírate este vídeo: http://d.hatena.ne.jp/video/niconico/sm4500495
Está lleno de altibajos. La fase 2 es digna, la 1 y la 3 son más que pobres. Es un "mix" de escenas de Gradius anteriores, de todos modos, y el problema aquí es que los gráficos (o parte de ellos) están escalados, como muestra la primera captura del hilo. No te fíes de las capturas comprimidas.
21.073 02-09-2008 17:48:35
Re: Gradius Rebirth (WII). (17 respuestas, enviadas el Hablemos de juegos)
Ya está a la venta y ya tenemos vídeo mostrando toda la primera fase:
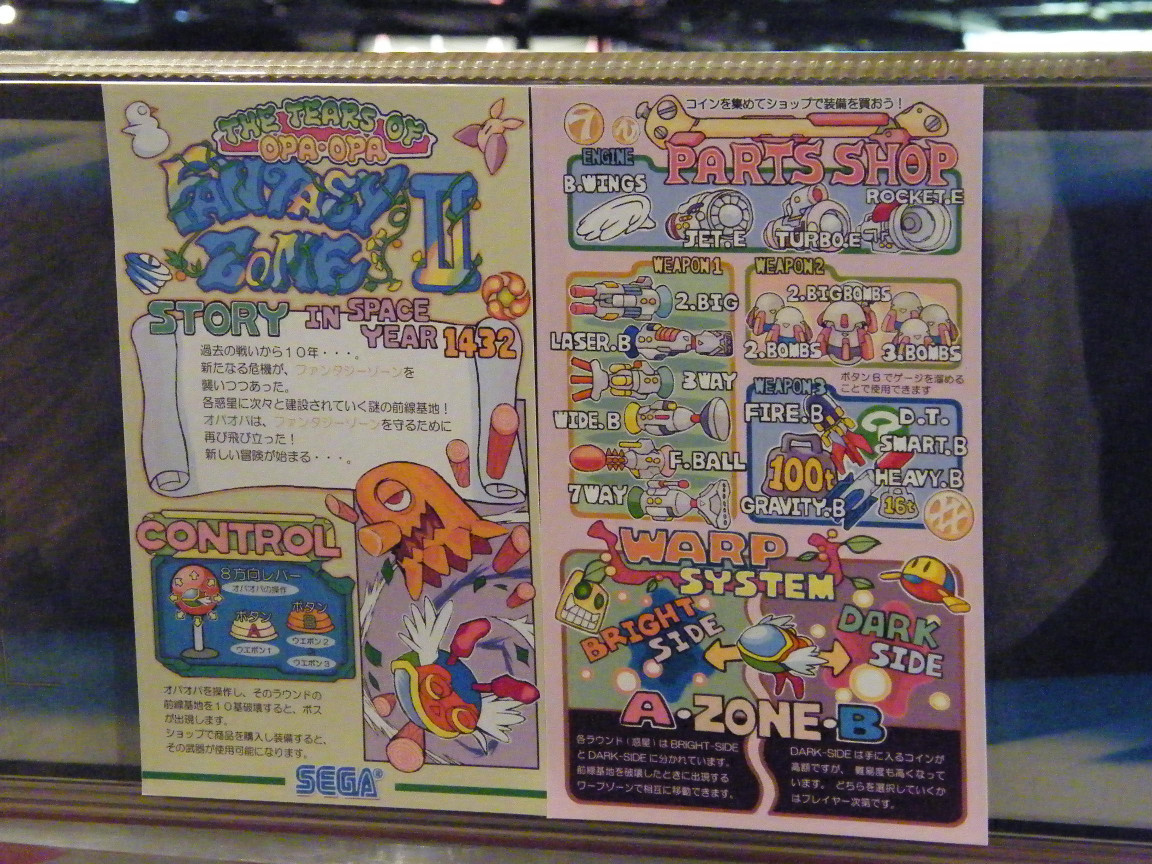
21.074 02-09-2008 17:45:18
Re: Fantasy Zone II DX (PS2). (20 respuestas, enviadas el Hablemos de juegos)
Sazanami nos muestra que hasta las instrucciones se las han currado al viejo estilo:
http://sazanami.net/nikki/200809/080901_001.jpg
La "demo" vuelve a estar "on-line", por cierto.